Friday, April 9, 2010

Hi Everyone!

Sorry I have been sooo neglectful! I am finishing up my last month of school, and I decided that I need/ed to take a break from my blog for a bit and prepare everything else for now. I can count all of my assignments due on two hands, and I have to write my senior paper. So, I am still in the kitchen, working, gardening, schooling, dreaming, dog sitting/house sitting, biking(!), but I will be back to you some time in Mid-May. Here is a little share of some things I have been doing.
And... this is what my garden holds as of now: Oregano, rosemary, lavender, dill, sage, marigolds, swish chard, kale, lettuce, onions, and carrots. I am hoping to get some beans, peas, squash, tomatoes (this is a must), asparagus, and peppers out there. I also strewn about wildflowers along a path in our backyard (in a semi-organized manner). Enjoy April and all of your spring starter plants!! See you in May!

Kitchen happenings. Top (left) mini pork meatballs (right) zucchini bread. I can't wait to grow my own! Bottom (left) heirloom mini tomatoes from D'lish (right) simple chicken, tomato, basil-tomato pasta, oil, and Parmesan salad.

Saturday, March 6, 2010

Pumpkin Muffins


I am feeling a little under the weather today. So under the weather, in fact, that I didn't feel like making supper (Dan is making us Mac and Cheese with broccoli and extra cheese), however I did feel like making muffins. These muffins were my perfect fix. They were really easy to make, fairly seasonal in ingredients, and things you normally have on hand. Pumpkins are still sort of in season right? So, hear is another recipe I adapted from Smitten Kitchen (are you getting sick of them yet). They are very moist, the right amount of spice, and almost took me back to Christmas in the early days of March.

Pumpkin Muffins
adopted from Smitten Kitchen
Makes approximately 2 dozen medium muffins.

Ingredients
3/4 c. unbleached all-purpose flour (or bleached is fine too)
3/4 c. whole wheat flour
1t baking powder
1c canned pumpkin (from a 15oz can) I used organic
1/3 c. vegetable oil*
2 large eggs
1t pumpkin-pie spice (clove, ginger, nutmeg, cinnimon)
1 c. + 1T pure cane sugar
1/2t baking soda
1/2t salt
1t cinnamon

*I replaced 1/6c of the oil with yogurt, I would assume you could replace all of it with out a significant difference in taste or texture.

Directions
Set the oven at 350 degrees. 1. Mix the flours and baking powder. 2. Mix the next ingredients minus 1T sugar and the final 1t cinnamon. 3. Mix the flour mixture with the batter. 4. Fill muffin tins (with or without the paper cups- the ones I didn't use the paper cups with turned out better) about 3/4ths full. 5. Mix remaining 1T sugar and 1t cinnamon together and sprinkle over the muffins. 6. Bake in the oven for about 20-30 mins. at 350 degrees.


Friday, March 5, 2010

I want to make a simple, whole wheat sandwich loaf of bread.

There. I said it.


It seems sooo easy to just say it. I don't think I have confessed my fear of bread making yet to you all.. its big. I feel like there is so much mounting pressure to make a great loaf the first time or to allocate a lot of time to keep making and making bread until you get it. Usually I think about trying to make bread when my store-bought loaf is starting to look a little low. Well that only gives me about two days to perfectly create a new loaf of bread, but who wants to be making bread for two days..? I don't have time. So, maybe its my inpatients or maybe it is my lack of experience, but making bread has always been a little struggle in my baking world. So for tonight, I am attempting the perfect loaf, once again. I have two days before my store-loaf is gone. I better get a move on.....


Here are some inspiring pictures that keep me going on my bread venture...


I think I can, I think I can, I think I can, I think I can.

Monday, March 1, 2010

Crock Pot BBQ Chicken Wings

So, I haven't exactly made any sort of chicken wing or leg yet. Period. Its intimidating. I was browsing Local D'lish's website this weekend and I spotted this Crock Pot BBQ Chicken Wing recipe and it just looked too good and too simple to not try. So for all of you out there that are intimidated by a big'ole basket of homemade BBQ wings try this one out! It is fantastic. Like Julia said, "it is perfect for one of those cold winter days when all you want to do is curl up and read a book." It is such an easy meal to start cooking and leave it to do the work. I chose to use the BBQ sauce local in Minnesota that D'lish recommended, but I bet this recipe would be great with your favorite BBQ sauce. I prefer something a little sweet and alotta spicy so the next time I make this I will be looking at some additional hot sauce to put an extra kick on it! All of the ingredients listed can be found local to Minnesota and found at Local D'lish, however, I challenge you to find these ingredients local to you! 


Crock Pot BBQ Chicken
from Local D'lish and Julia (from February 2nd 2010)

Ingredients
1-2 lb Callister Chicken Wings (or chicken wings from your local farmer)
1 yellow onion, thinly sliced
1 12 oz bottle Lucky’s Bar-B-Que Sauce (Applewood Roasted Jalapeno, Garlic and Honey)

Directions
1. Salt and Pepper the chicken and saute them in a pan drizzled with a little splash of olive oil until they brown lightly, 3-4 mins. on each side, do this in batches so to not crowd the chicken. 2. Spray your crock pot with some oil and place the chicken in the bottom, spread out evenly. 3. Add the onion into crock pot. 4. Drizzle 3/4 of the bottle of BBQ sauce evenly. 5. Cook on high for 3-4 hours. 6. Add the rest of the BBQ sauce

I served these as-is with a side of creamy cheesy mashed potatoes. D'lish also suggests that they would also be great shredded and eaten on a bun with a side of cole slaw and beans.

Saturday, February 20, 2010

Community Garden Season is right around the corner!

I decided that my feeble gardening attempts would be better cultivated (get it..) in a community garden atmosphere this year. I will learn a lot share recipes and pointers, and I won't have to worry about bad soil and little sun! Don't worry, I know what you're thinking... I haven't given up backyard gardening. In my current rented house I don't have much of a backyard to garden! What are you guys doing this year? Does anyone have any backyard ambitions? Community garden?

Tuesday, February 9, 2010

Chocolate-Raspberry Tiramisu

This sweet recipe was called for on the account of one of my best friends birthdays! And I am a big believer in birthday celebrations! My roommate Jenna (who I've previously introduced to you) and I decided to tackle this very easy nontraditional tiramisu recipe from her Best of Cooking Light cookbook which she has been having a hard time peeling her eyes from since she got it!

Chocolate-Raspberry Tiramisu
adopted by Cooking Light
Makes about 12 minis

Ingredients
1/4c powdered sugar
1/4c (2oz) mascarpone cheese, softened
1/4c raspberry-flavored liqueur, divided
1 (8oz) block fat-free cream cheese, softened
12 cake-style ladyfingers, split (we couldn't find ladyfingers, believe-it-or-not, so we used Twinkies, scraped and split)
1 1/2T unsweetened cocoa
2c fresh raspberries
mint sprigs (optional)

Directions
1. Place powdered sugar, mascarpone, 1 1/2T liqueur, and cream cheese into a large bowl, and beat with a mixer at a high speed until blended well. 2. Brush cut sides of ladyfingers with remaining 2 1/2T liqueur. Spread about 1 1/2T mascarpone mixture over bottom half of each ladyfinger, cover with tops. 3. Arrange on dessert plates. Sprinkle evenly with cocoa (sift cocoa over desserts with a sifter) and arrange raspberries over each. Garnish with mint sprigs.

Teaser Pic!

Guess what Jenna and I are bakin' up in the kitchen tonight??

Hint- It's our lovely friend Caitlin's Birthday!

Monday, February 8, 2010

Hearty Tomato Bisque and the Onion Monster!

Brooke: I love onions. I love onions so much that I could eat them like an apple.
Me: Really? Like an apple?
Brooke: Yeah I really like them. You rememb...
Me: (Interrupting) Prove it.
Brooke: Uh...what?
Me: Prove it.
Don't fret. (onion monster enters the scene...luckily we captured it all on film to show you guys)
She shows no mercy.
RAWR!
Muahahaha (Evil cackle after onion defeat)
Shortly after we put the onion out of its misery.

This my friends is a recipe that will stand the tests of time. It is one of the most phenomenal, knock your socks off soup recipe. Words.... wor... they can't even describe this masterpiece.

Tomato Bisque Recipe
adapted from The Food NetworkServes 4-6
Ingredients
1T olive oil
1/2 medium onion, chopped
1 medium carrot, chopped
1 stalk celery, chopped
2 cloves garlic, minced
5T all-purpose flour
5c chicken broth (or veggie broth)
1 (28oz) can whole, peeled tomatoes (with liquid), chopped
3 parsley sprigs (or about 1/2T dry parsley)
3 fresh thyme sprigs (or 1/2T dry thyme)
1bay leaf
1 cup heavy cream
1 3/4 teaspoon kosher salt
Freshly ground black pepper

Directions
1. Heat the oil in a large soup pot over medium heat. Add the onion, carrots, celery, and garlic and cook, covered, stirring occasionally, until soft and fragrant, about 8 minutes. 2. Stir in the flour and cook, stirring, for 3 minutes. Pour in the broth and tomatoes and bring to a boil while whisking constantly. Tie the parsley sprigs, thyme, and bay leaf together with a piece of kitchen twine and add to the pot (sprinkle in if using dry ingredients). Lower the heat, place the lid on, and simmer for 30 minutes. Remove from the heat and allow to cool. For those of you who are impatient like me, fill kitchen sink with ice cube (aprox. 1 tray) and ice cold water to speed up the cooling process. 3.When the soup base is cool, remove and discard the herb bundle. Working in batches (if you need to), transfer the mixture to a blender and puree until smooth. Using a sieve (I used my food mill) over a large bowl, strain the tomato puree. Return the puree to the pot and reheat over medium heat. Whisk the heavy cream and salt into the soup and season with pepper to taste. Divide among warm soup bowls and serve immediately.
Almost all gone!

Saturday, February 6, 2010

Cookbook oh Cookbook...

I've been recently on the hunt for a new cookbook. The kind that makes me want to get my hands wet, and then before I know it my whole being is in a tub of recipes that I can't wait to taste and share with you all. You know, I want to be eyes deep in food. So, this is it. Well, not it, as in, tada "I've reached the end of the rainbow, now what?" But, this is IT! I ordered this cookbook and I am gripping at my cutting boards waiting for it to come. I am pacing the kitchen with bowls of all sizes in my mits. I can't wait. 
Ok ok, I'll stop scaring you. I'll try to tone down my excitement enough to tell you all about it. It is a cookbook created (recipes, photography, and all) by Heidi Swanson from 101Cookbooks (a fantastic go to site for all of your cooking and baking needs). Super Natural Cooking is  cookbook that is all about cooking whole, natural, non-processed foods. The recipes are vegetarian recipes (for all of you carnivores out there like myself you can usually stick in a chicken leg or some lamb chops here and there) that are made with care for you and care for the planet! Check out the book here and her website here (did I mention that it is in my top 5 go-to cooking pages?!).
Cookbooks are hard for me to purchase because there are so many out there and I am one to judge a book by the cover, but with cooking and baking, most of the time you must see the writer's credential to know if you will like their style of cooking, photography, and their style of writing.

Do you guys have any favorite cookbooks that you have or would like to get soon??

Friday, February 5, 2010

Happy Friday!

Hey everybody this is my sister Brooke. Hi Brooke. I am very excited because she is coming down to visit today!!! Yay! She's a little goofy, but I think we can keep her around for a while. These are some of the exciting things we are going to be doing:

Zza celebration of taco pizza and guacamole from Joy the Baker (a new foodie that I just discovered!), Movies, the BEST tomato soup OF MY LIFE! (seriously, its really really good - recipe to come), Gouda and pumpernickel bread, board games, and much more!! Don't worry, don't fret. I won't leave you guys out at all! I'll be bringing you some pictures to join in the fun and the recipes to try out!

What are you doing this weekend?? Any exciting food adventures that you are holding back?

Saturday, January 30, 2010

I think this one might be close

So, I know I didn't previously use this recipe from Smitten Kitchen because she just put it on her website. However, I am going to try it soon and cross my fingers and hope two things. 1. That they are better than the ones from the first recipe/post that I tried 2. That I can try it before I lose this new recipe too! (as back up I am going to put it onto a Word Doc. on my computer... just for safe keeping, you know!)

Cross your fingers for me too PLEASE!

Friday, January 29, 2010

A long-time favorite

I've been trying to make new ways to jazz up my grilled cheese sandwiches..... and I think i found one of my new compilations. American cheese, Havarti cheese (If you haven't tried it yet put it on the top of your list!), and some tomato slices (I've already started looking forward to fresh summer tomatoes).

Does anyone have any other ways they serve their grilled cheese gooeyness?

Thursday, January 28, 2010

Learning the Art of Poached Eggs

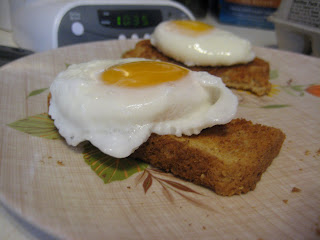
Last weekend my roommate Jenna taught me how to poach an egg without a poacher! I have never attempted nor tried a poached egg. It always sounded so fancy and I just assumed that meant very very difficult to make with fancy equipment. But I learned that it is actually really really easy and doesn't require hardly any equipment. Just the stuff you more-than-likely already have in your kitchen cupboards: a frying pan, eggs (of course), bread, and a splash of vinegar, spoon/measuring cup, a ladle or spatula. The vinegar is supposed to keep the egg white together.

Directions
1. In a medium sized frying pan simmer water and a splash of vinegar enough liquid to reach 1 1/2 to the bottom (or about 1/2 of an inch from the top lip). 2. Put your egg in a measuring cup or spoon and gently set it into the middle of the simmering water. I am told that you can push on "the white" to keep it close to the yolk (however I haven't tried this yet). 3. The egg should be done after 3-5 mins. Take it out of the water gently. I used a ladle to do this. I can imagine you could also use a spatula. 4. Set the egg on a piece of toast (or by itself) and chow down! It breaks really easy and it doesn't have a ton of grease all over it.
I am feeling really redundant, but Smitten Kitchen also has a really great "how to poach an egg" recipe (I swear she doesn't pay me to advertise!). How do you poach your egg? Any advice on mine??

Monday, January 25, 2010

Peanut Butter Cookies Like My Grandma Used to Make


My grandma Betty used to make some of the worlds BEST peanut butter cookies, and I have never been able to find a recipe I liked as well as I did hers. It was a cookie taste that we spin me back to when I was a wee little girl, sitting in the kitchen with my grandma (although she never sat down)!

Well these cookies aren't hers, but they are now sitting right up there on the top of my list! These are fantastic little guys to snack on (or devour as a meal...). They have a crunchy, sugar crystallized exterior with a inside that is as soft and fluffy as a cake.

Once again, I adopted this recipe from one of my favorite blogs Smitten Kitchen. She has a fantastic cookie line-up. Check it out in her recipe archives!!


Peanut Butter Cookies
adopted by Smitten Kitchen
Makes about 2 dozen
Ingredients
1 1/4c flour
3/4tsp baking soda
1/2tsp baking powder
1/4tsp salt
1c peanut butter (I always prefer crunchy)
1/2c unsalted butter, softened
3/4c sugar (I used pure cane sugar)
1/2c packed brown sugar
1 large egg, at room temp.
1tbsp milk
1tsp vanilla extract


Preheat the oven to 350 degrees. 1. Mix flour, soda, powder and salt. 2. Blend butter and peanut butter until fluffy. 3. Add sugars and mix. 4. Mix in egg, milk, and vanilla. 5. Finally mix the flour mixture in with the peanut butter mixture. 6. Sprinkle 2 tablespoons of sugar on a small plate and roll the cookies in the sugar to coat before placing onto an non-greased baking sheet. Use a fork to make criss crosses on the top of the cookies (being careful not to press too hard). Pop these bad boys in the oven and wait for 10 mins. to take them out!


Sunday, January 24, 2010

The Perfect, Simplest Spaghetti Sauce

I pulled this recipe from one of my favorite "webcookbooks" Smitten Kitchen and adopted it to my own tastes. This recipe is very easy; it will be even more wonderful in the summer when tomatoes are in season and abundant. This recipe also inspires me to can some whole tomatoes this summer so I can easily whip some up next winter!


(Source)
Onions

Whole Canned Tomatoes


Simmering Sauce


Finished Product
(Yes, I always get whatever I am cooking all over my stove...)


Tomato Sauce with Butter and Onions
adopted from Smitten Kitchen
Serves about 4 (I would add another half recipe if you have garlic bread that you like to load with sauce!)

Ingredients
24oz of whole peeled tomatoes from a can
1 medium yellow onion
5 tbsp of butter
Pinch of salt
Clove of garlic (minced)
Pinch of Italian seasoning

Put can of tomatoes, butter, onion (half chopped, other half whole) in a medium pot, garlic, and sprinkle with a pinch of salt. Turn the oven on to a simmer and let the pot of sauce ingredients simmer slowly for 45mins. Check on it occasionally to stir. When the tomatoes start to soften after about 30mins. squish them on the side of the pot with a wooden spoon to crush. Discard the half onion. I served this over angle hair pasta that I seasoned with the Italian seasoning (you could also sprinkle some into the sauce while it is simmering) with garlic bread! Mmmm...!

Tuesday, January 19, 2010

I'm very sad to inform you:


(Source)
...that I couldn't find my dark cocoa brownie recipe in all of my cookbooks and all of my recipe blogs. I've even spent the last two days tracing my footprints. :( This is sad for both you and I. When we both cross paths in the future I will be sure to tell you about it. Dry your eyes. (I understand. It took me a while to dry my tears too).

My two favorite cheeses at the moment.

One of my life goals (this may sound really cheesy and childish) has been to be able to state a favorite beer, wine, and cheese. Well, I am happy to state that I have found all that I feel proud to state publicly in front of mature beings.

(Mature Being: "What is your favorite wine?" Me: "Um... red...")

So.... Here are my top two favorite cheeses:


(Source)

Gruyere
Found in Switzerland, this cheese is made from cows milk and fully matures in 5 months to a year. When young, it is said to have a creamy, nutty taste, and with age it develops more into a more complex and earthy cheese. Wikipedia (yes I believe it is credible to source) says that this cheese is one of the finest cheeses to bake with because it complements food verses overpowering them. It is best paired with Riesling and other white wines. And beers such as Bock and also sparkling apple cider.


Havarti
Havarti was named after a farm in Denmark. It is made from cows milk and is aged for at least three months. It has a buttery tangy taste, and as it ages the taste gets more complex; it becomes more salty and tastes like hazelnut. This cheese is very popular on sandwiches because it slices well. Wikipedia says it "Havarti is popularly matched with lesser-oaked Chardonnay, Sauvignon Blanc, or light-bodied Pinot Noir wine and occasionally accompanied with figs; smoked turkey; raisins; walnuts; hearty bread; pears; apples. The cheese also is an excellent snack on (sometimes salted) thin wheat crackers."

Wednesday, January 13, 2010

Dark Chocolate Brownies

Unsweetend Cocoa PowderFloured Cake Pan
Out of the Oven!I sprinkled some powder sugar on top, and cut them into squares!

These brownies were fantastic! They weren't your average brownie. They were made with unsweetend cocoa powder so they are more rich than sweet (which I love). Second, they didn't get the typical brownie top. They were a little dry and not as gooey as brownies typically are, however, I do like this change for brownies. When I have my bakeshop I will have both! These are great for a chocolate snack that isn't loaded with sugar! Recipe to come...